Code-Server 在浏览器中Coding的核武器
时间: 2022.12.13
远程写代码是很多人一直渴望的功能,这样可以减少文件拉取工作,同时,也可以降低对本地终端的性能要求。已有的VsCode和很多IDE工具虽然早已经具备了这样的功能,但是还需要在本地安装IDE的设计显然没有彻底解决这一任务,任然对本地客户端的资源占用有一定的要求。如果想在pad或者手机上来写代码的话,那显然还是无法得到满足。对此,最近了解了一个核武器级别的工具——Code-Server,这是一款可以直接部署在服务器上的软件,通过开启服务后,可以让编程者直接通过浏览器访问服务器上的代码、数据和环境,从而彻底解脱了需要在本地安装IDE等功能的问题,甚至可以直接拿着pad编程。下面将记录本人使用Code-Server的详细笔记。
最简教程(丐版)
在这里,我首先会给出一个最简单的使用教程,可以直接理解为“下载-安装-使用”。
去Code-Server的官网下载适合服务 器(Server机)的版本。此处使用的服务器是Ubuntu系统,因此选用了下面的版本。
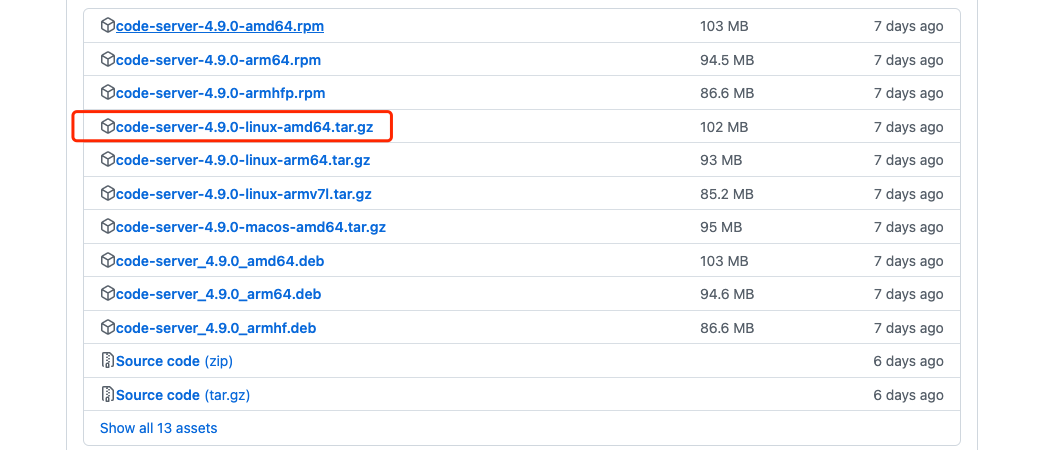
下面进入命令行操作:
wget https://github.com/coder/code-server/releases/download/v4.9.0/code-server-4.9.0-linux-amd64.tar.gz
tar -zxvf code-server-4.9.0-linux-amd64.tar.gz
cd code-server-4.9.0-linux-amd64
export PASSWORD="password" # 输入自己的密码
./bin/code-server
然后在浏览器内通过localhost:8000即可访问。
使用升级(pro版)
在使用了一段时间后,发现了几个问题:
1.局域网其他机器无法访问
2.无法打开markdown和jupyter等文件
通过分析发现是缺乏进一步的配置。首先对于问题1,可以通过下面这种启动方式:
./bin/code-server --host "0.0.0.0" --port=8000
之后就可以在局域网内直接访问ip:8000。
对于第二个问题,这是因为code-server需要在https加密模式下才能在浏览器中正常使用。如果自己有域名和DNS,可以参考官方教程
这里采用制作证书的方法解决问题2。具体过程如下:
1.下载制作证书的软件 mkcert: https://github.com/FiloSottile/mkcert/releases
wget https://github.com/FiloSottile/mkcert/releases/download/v1.4.4/mkcert-v1.4.4-linux-amd64
2.安装 mkcert
sudo apt-get update -y
sudo apt-get install libnss3-tools
sudo mv mkcert-v1.4.4-linux-amd64 /usr/bin/mkcert # 将下载的二进制文件移动到系统路径
sudo chmod +x /usr/bin/mkcert # 设置权限
mkcert --version  # 查看版本
3.用mkcert生成本地CA证书
mkcert -install

# 输出:
Created a new local CA 💥
The local CA is now installed in the system trust store! ⚡️
ERROR: no Firefox and/or Chrome/Chromium security databases found
4.mkcert制作证书
mkcert -CAROOT

# 输出:
/home/USRE/.local/share/mkcert
5.mkcert为本地托管的网站生成证书和密钥文件
mkcert example.com "*.example.com" localhost 127.0.0.1 ::1 xxx.xxx.xxx.xxx

# 输出:
Note: the local CA is not installed in the Firefox and/or Chrome/Chromium trust store.
Run "mkcert -install" for certificates to be trusted automatically ⚠️

Created a new certificate valid for the following names 📜
 - "example.com"
 - "*.example.com"
 - "localhost"
 - "127.0.0.1"
 - "::1"
 - "xxx.xxx.xxx.xxx"

Reminder: X.509 wildcards only go one level deep, so this won't match a.b.example.com ℹ️

The certexample.comificate is at "./example.com+5.pem" and the key at "./example.com+5-key.pem" ✅

It will expire on 13 March 2025 🗓
6.配置code-server/config.yaml
vim ~/.config/code-server/config.yaml

# 参考下面
bind-addr: 0.0.0.0:port
auth: password
password: yourpassword
cert: your cert file address # 配置5生成的文件
cert-key: your cert key file # 配置5生成的文件
7.客户端配置证书(mac)
首先从服务器中复制4生成的文件到本地,然后打开应用“钥匙串访问”-左侧“登录”-右侧“证书”,将获得的“rootCA.pem”拉到右下侧空白区域,并双击击设置“信任”-“始终信任”
8.服务器重启code-server
./bin/code-server --host "0.0.0.0" --port=8000
9.浏览器访问ip:8000,可以正常打开并编辑markdown,jupyter。
参考链接
https://blog.csdn.net/Borton__/article/details/123835430
https://0xzx.com/2021081700281668036.html
问题
按照上述配置后,发现了新问题:
为了将问题描述清楚,先回顾一下我的整体框架,在上述系统中,主要涉及三台机器:Ubuntu服务器(部署服务),腾讯云服务器(公网IP)和访问客户端,三者的关系如下图所示。在丐版教程中,三者可以相互通信,但是使用了https后,仅局域网内可以相互连接。